1. Overview
1.1. Modular concept
Gridsim is spread over multiple modules in order to minimize dependencies and
maximize the flexibility for the user. Especially each aspect of the simulation
is kept in a separate package and the simulation is driven from the main package
gridsim.simulation.
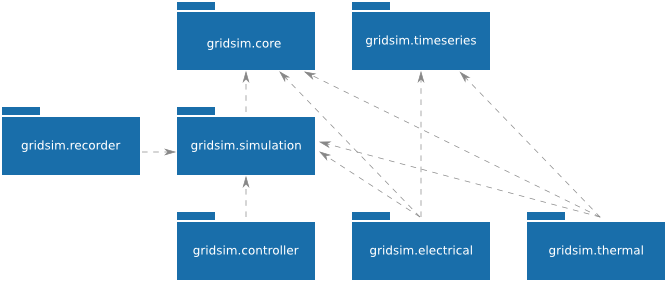
The following illustration shows the idea behind this concept:

Gridsim organisation
1.1.1. Simulation
1.1.1.1. Core
The Gridsim core includes several packages which orchestrate the whole simulation process and offers useful functionality to users (developers or simple users).
1.1.1.2. Simulator
The Gridsim simulator gives an access to the functionality of the simulation via
a simple API. The Simulator object keeps the time of
the simulation and enables the user to proceed in time either by steps or by
running the simulation for a given time and step size.
1.1.1.3. Electrical
The Electrical simulation takes care of the actual electrical simulation of Energy Consumers and Producers.
This module takes care of all connections between electrical nodes. The module currently supports 2 calculation methods:
- Direct Load Flow Computing: for fast results.
- Newton-Raphson Load Flow Computing: for a detailed simulation.
1.1.1.4. Thermal
The Thermal simulation module enables simulations of simple thermodynamic processes and their interaction between each other and by heating or colling them electrically.
1.1.2. New simulation modules
Of course you can add your custom simulation module to the system. If you want to develop your own module, you should read The Simulation Core and The Simulation Tools pages.
1.1.3. User Interface
1.1.3.1. Control
Provides control strategies in order to control an attribute of an object based on the current values of attributes of that or other objects.
1.1.3.2. Time series
Offers a very simple way to load the content of data from
gridsim.iodata.input into object attributes.
1.1.3.3. Recorder
This module can be used to record attributes of numerical time either in order
to provide data to by gridsim.iodata.output to save them in a lot of
formats (e.g.: png, pdf, etc.).
1.2. Simulation process
This section provides a brief explanation of how to use the simulator, if you want more information about use the simulator you should read The Simulator General Use.
Before doing anything else, you have to create an object of the class
Simulator. This will automatically, almost magically
create an instance of each simulation module you have imported into your Python
file.:
import gridsim.simulation
import gridsim.electrical

sim = simulation.Simulator()
The fact that you import the gridsim.electrical package registers the electrical
simulator within the simulator and every time an instance of the class
Simulator is created, an instance of the electrical
simulation will be created too and registered within the main simulation object.
If you import a class from a module such as
ElectricalPVBus, you do not need to import
the package. It will be automatically done.
The next step would be to add elements to the different simulation packages and actually to create a topology by defining the interactions between the elements. How this is done hardly depends the simulation module used.
Once the elements and the topology are defined, the simulation can be started using the main simulation object:
sim.reset()                         # Resets the simulation. This is optional and will be
                                    # called automatically before doing the first step.
sim.step(0.1)                       # This will simulate a single step of 0.1 second.
sim.run(1 * Simulator.HOUR, 0.1)    # This simulates an hour with a resolution of 0.1
                                    # seconds per step.
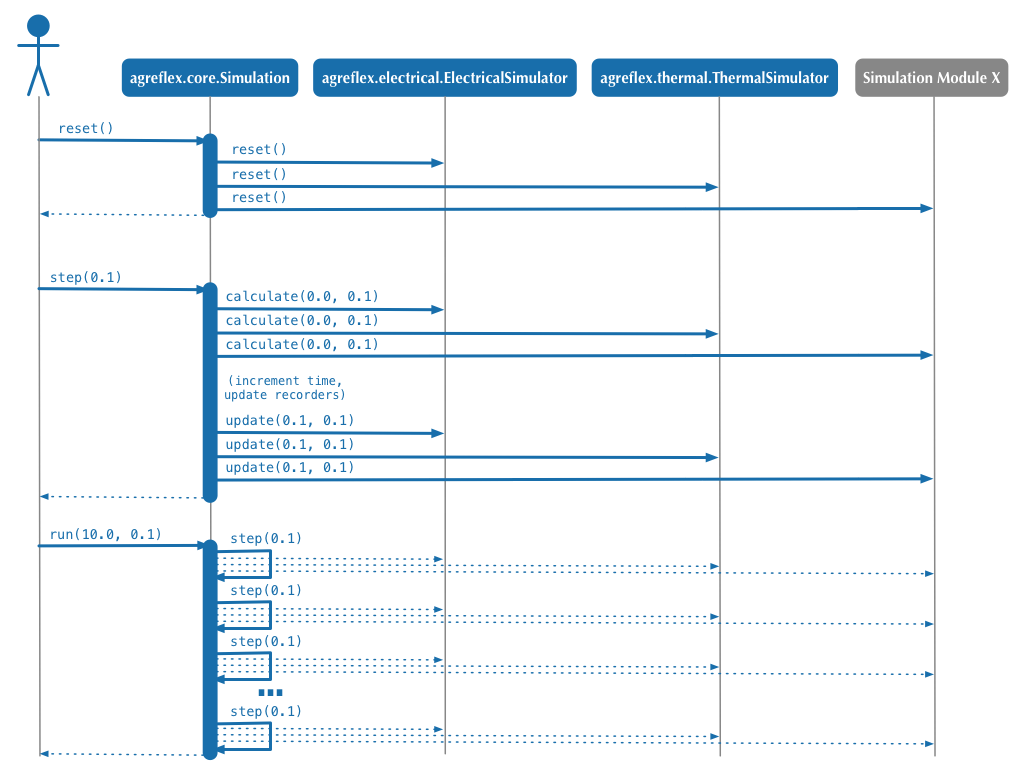
The following figure shows the typical interaction between the Gridsim simulator object and the simulation modules:
- Calling the
gridsim.simulation.Simulator.reset()method of the Simulator object will callgridsim.core.AbstractSimulationModule.reset()on each registered simulation module. - When a single simulation step has to be executed by calling the
gridsim.simulation.Simulator.step()method, thegridsim.simulation.Simulatorobject calls first thegridsim.core.AbstractSimulationModule.calculate()method on every registered simulation module, allowing them to calculate the internal states of all their elements. Then the time value is incremented by the step size before thegridsim.core.AbstractSimulationModule.calculate()method is called on each registered simulation module in order to make the internal states of their elements public. - The method
gridsim.simulation.Simulator.run()calls the step method simply as long as the sum of the step sizes done is less than the given run time.
Despite the fact that the simulation module is completely free how to organize its internal simulation behavior, the normal case is shown in the following sequence diagram:
If the
gridsim.core.AbstractSimulationModule.reset()method is called, the module should just call thegridsim.core.AbstractSimulationElement.reset()method on each simulation element, as the element probably knows best how to reset his internal and external state.For the
gridsim.core.AbstractSimulationModule.calculate()method there are basically two scenarios possible:- Delegate the actual calculation to the elements
(blue in Sequence diagram of a simulation single step):
In this case, the simulation module just calls the
gridsim.core.AbstractSimulationElement.calculate()method on all his elements and the actual simulation calculations are made inside these. This is the simplest, but almost for sure the most inefficient method. - The Simulation module calculates the values (green in Sequence diagram of a simulation single step): This enables the simulation module to use optimized matrix calculations or vectorized version of the algorithms in order to accelerate the calculation.
- Delegate the actual calculation to the elements
(blue in Sequence diagram of a simulation single step):
In this case, the simulation module just calls the
The main simulation object calls the method
gridsim.core.AbstractSimulationModule.update()on all simulation modules in order all simulation elements copy their private state just calculated to the public attributes. In the most cases, this can be implemented by the simulation elements and the simulation module has just to call thegridsim.core.AbstractSimulationElement.update()method on all these elements it manages.
1.3. Packages
The following figure shows the structure of the gridsim framework:
Note
This diagram presents the main packages of Gridsim and the link between them.
The number of packages as well as their link will evolve over time as new modules and features can be written to handle a new simulation aspect.
1.4. UML diagrams
1.4.1. Simulation
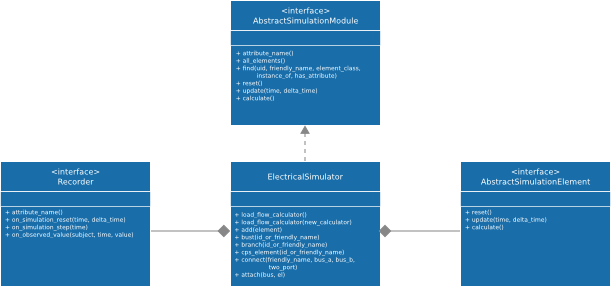
This diagram presents the heart of the Gridsim simulation framework.
The Simulator is the main class of Gridsim. It is
composed of modules (such as
ElectricalSimulator) themselves composed of
elements (such as ConstantElectricalCPSElement).
These elements are the living part of the simulation, they will evolve during
the time and interact with others to simulate the exchange of energy.
A simulation with no output is pretty useless, so the
Recorder module enables to save the simulation data
either in text based files or enables to plot the values. The following figure
contains a detailed UML diagram of that module.
We refer to the The Simulator General Use for more details...
Note
The packages are not displayed in this diagram.
1.4.2. gridsim.electrical
The gridsim.electrical module implements the electrical part of the
gridsim simulator. It basically manages Consuming-Producing-Storing (CPS)
Elements, which consume (positive sign) and/or produce (negative sign) a certain
amount of energy (‘delta_energy’) at each simulation step.
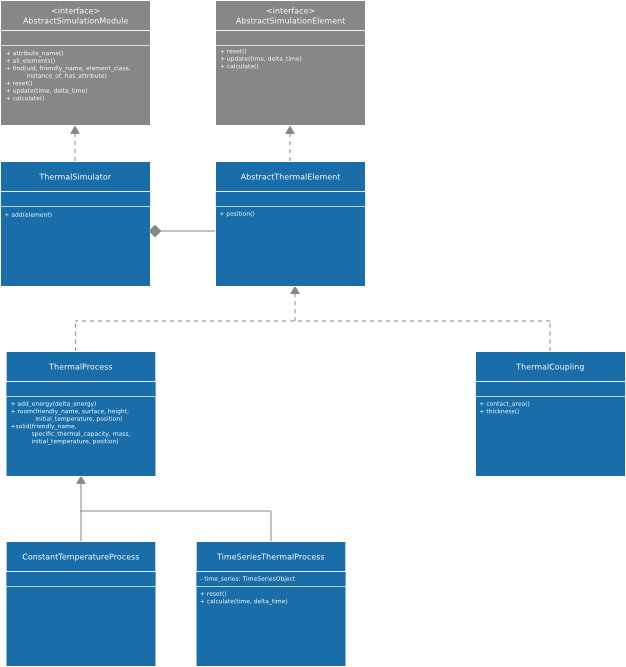
1.4.3. gridsim.thermal
Enables the simulation of thermal processes and their interactions. The following illustration shows a detailed UML diagram:
We refer to the The Simulator General Use for more details...
1.4.4. gridsim.control
Enables the simulation of control strategies and devices by writing to Python attributes depending the actual value of the same or other attribute values.
We refer to the The Simulator General Use for more details...


